# AppsFlyer - App Reengagement Campaign Settings
### OneLink Template Creation
{% hint style="danger" %}
### OneLink - IMPORTANT
Setting up a OneLink in Appsflyer requires actions from **both MARKETER and DEVELOPER**.
* For clients with other retargeting campaigns using OneLinks - *skip to* [#check-app-settings](#check-app-settings "mention")*.*
* For clients using OneLink for the first time - *please go to this page for the guide:* [OneLink Template Creation](/app-campaign/appsflyer-integration/appsflyer-app-reengagement-campaign-settings/onelink-template-creation.md)
{% endhint %}
***
{% hint style="success" %}
### 📘Screenshots
In the following guide, there are 7 sections that require screenshots.
Please take these screenshots and provide them to us.
Providing accurate screenshots helps speed up and ensure the quality of your campaign onboarding process.
{% endhint %}
### Check App Settings
**Check each setting under App settings is correct**
1. Click "App Settings" on the dashboard for your app.
2. Turn **OFF** "Aggregated Advanced Privacy" (iOS Only).
{% hint style="success" %}
### 📘Screenshot 1 of 7
Share a screenshot making sure Aggregated Advanced Privacy is disabled.
{% endhint %}
3. Turn **ON** "View-through attribution via probabilistic modeling" for both OS if you want to run view-through attribution.
{% hint style="success" %}
### 📘Screenshot 2 of 7
Share a screenshot making sure view-through attribution via probabilistic modeling is enabled.
{% endhint %}
{% hint style="warning" %}
### 🚧Note
* Note that if running on both iOS and Android, each app has its own App Settings page that will need to be set.
* [Appsflyer Guideline](https://support.appsflyer.com/hc/en-us/articles/211719806-App-settings#viewthrough-attribution-via-probabilistic-modeling) also recommends advertiser to enable View-through attribution via probabilistic modeling.
{% endhint %}
4. Turn **ON** "Re-engagement attribution".
5. Select **None** for "Minimum time between re-engagement conversions".
6. Save settings.
{% hint style="success" %}
### 📘Screenshot 3 of 7
Share a screenshot making sure Re-engagement attribution is enabled and Minimum time between re-engagement conversions is set to "None".
{% endhint %}
***
### Navigate to the Appier partner integration module
**Select Appier module to do the following settings**
7. Click "Active Integrations" on the navigation sidebar.
8. Insert "Appier" in the search bar
9. Choose the partner integration module based on what kind of campaign will be run:
* For programmatic DSP (AiBid) campaigns, choose "Appier"
10. Click "Set up integration" on the partner page
***
### Setting postback
**Appier needs Appsflyer postback event to us if Appier drives any action to the app.**
11. Select Integration.
12. Turn ON "Activate partner".
13. Turn OFF "Enable Advanced Privacy (for iOS 14.5+ and later)".
{% hint style="success" %}
### 📘Screenshot 4 of 7
Share a screenshot making sure Advanced Privacy (for iOS) is disabled.
{% endhint %}
14. Turn **ON** "Re-engagement View-Through attribution" if we will run view-through conversions.
{% hint style="success" %}
### 📘Screenshot 5 of 7
Share a screenshot making sure Re-engagement view-through attribution is enabled.
{% endhint %}
15. Change the Sending option for Default **Install** postback to "All media sources, including organic".
16. Change the Sending option for Default **Re-engagement** postback to "All media sources, including organic".
17. Turn **ON** "In-app event postbacks".
18. Select "Lifetime" for the postback window.
{% hint style="success" %}
### 📘Screenshot 6 of 7
Share a screenshot making sure Install and Re-engagement events have "All media sources, including organic" selected, In-app event postbacks is enabled and In-app event postbacks window has lifetime selected.
{% endhint %}
**Setting in-app event postback**
19. Choose "Add manually".
20. Click "Add event".
21. Choose the events which can be shared with Appier.
22. Select "All media sources, including organic".
23. Select "Values & revenue" if the event is related to ROAS.
24. Save Integration.
{% hint style="success" %}
### 📘Screenshot 7 of 7
Share a screenshot making sure In-app events have "Add manually" selected and added events under "for users from" are all using "All media sources, including organic" and under the "including" section "values & revenue" is selected for purchase events.
{% endhint %}
{% hint style="warning" %}
### 🚧Note
Set event to "All media sources, including organic" so Appier can accumulate and analyze the data.\
If the campaign needs to optimize ROAS, selecting "Values & revenue" is required.
{% endhint %}
***
### Account permission
**Share the report/postback setting/fraud report/link setting permission to Appier so it will be easier to onboard/optimize.**
25. Select "Permissions".
26. Turn **ON** "Ad network permissions".
27. Turn **ON** the following permissions.
28. Save Permissions.
***
### Generate links
**Appier needs the link from Appsflyer to run the campaign.**
29. Select "Attribution link".
30. Turn **ON** "Retargeting settings".
31. Choose "Use OneLink" and select the OneLink template. Please follow the guide in the link below to set up your OneLink template:
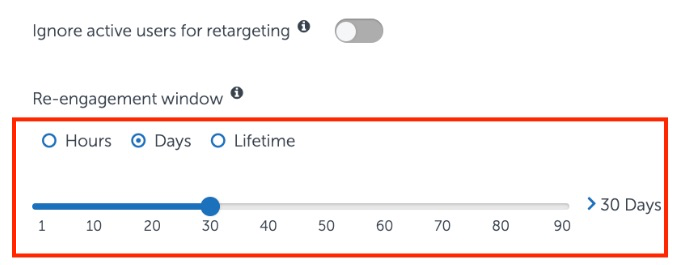
32. Decide "Re-engagement window" - How long the event will attribute and postback to Appier after the re-open/re-install attributed to Appier.
33. Copy "Click attribution link" and provide it to Appier.
34. Copy "Impression attribution Link" and provide it to Appier if you want to run the view-through conversion.
***
**Term explanation**
* Click look-back window:\
A look-back window is the period of time after an ad is clicked or viewed within which an install can be attributed, or matched, to the ad. Advertisers and attribution providers use lookback windows to determine if a specific click or view led to a user’s decision to download an app.
* Re-engagement window:\
The Re-engagement window is a time period, which starts with a user's re-engagement. During this window:\
The retargeting network is considered the primary attribution of in-app events performed by the user.\
The original ad network is considered secondary.
---
# Agent Instructions: Querying This Documentation
If you need additional information that is not directly available in this page, you can query the documentation dynamically by asking a question.
Perform an HTTP GET request on the current page URL with the `ask` query parameter:
```
GET https://docs.adcloud.appier.com/app-campaign/appsflyer-integration/appsflyer-app-reengagement-campaign-settings.md?ask=
```
The question should be specific, self-contained, and written in natural language.
The response will contain a direct answer to the question and relevant excerpts and sources from the documentation.
Use this mechanism when the answer is not explicitly present in the current page, you need clarification or additional context, or you want to retrieve related documentation sections.